The seats are made of eleven parts,and are beautiful little gems.After looking at some reference material and some screen caps of the show,I choose a color for the back end shell.Testors Pontiac Engine Blue Metallic was my choice.The seat post,and cushions and arm rests are Tamiya Semi-Gloss Black,the handles are Gloss Black,the seat belt are Flat Black with Silver trim.Note:There is a missing cross bar on the back of the seat,It should make a square that is the center of the back plate,and can be an easy fix.I don't know if this has been corrected,we must wait to see a production sample.
Friday, February 06, 2009
Wednesday, February 04, 2009
The Flying Sub comes with a stand,an exact reproduction of the Aurora stand.What a nice touch!I wanted to be able to put it on the stand or play,yes play with it!I came up with a solution that seems to be a trend in modelling recently,using magnets.I embedded a square of metal sheet in the lower hatch ring,and carved a recess for a magnet in the hatch itself.There is a plug which goes in the recess where the hatch goes,and that attaches to the stand.Now I can display it on the stand or do the diving shots in my tub!
This is a very well engineered model kit.It was made with a lot of for thought and ease of building for the modeller.The floor plate is of clear plastic,to be able to light the three hexagon panels from underneath.I first masked the panels with a liquid masking medium and painted the plate Intermediate Blue in the Model Masters line,and was rewarded with paint leaks.After stripping the piece with my favorite product, Testors Easy Lift Off,I used Tamiya masking tape(which I should of used in the first place!)cut the shapes out,shot the plate with two coats of Flat Black(I have several bottles of Pactra Flat Black Acrylic Paint,that's my favorite,and no longer made)to eliminate light leaks,and painted two coats of the Blue.Once dry,I peeled the tape off to admire my beautiful hexagons,nice and clean.I painted the underside with Tamiya Clear Yellow,and the seat plates,Tamiya Semi-gloss Black,and the front of the plate Tamiya Deck Tan,which is the overall color for the interior walls.The floor was then clear coated with Krylon Clear Satin for a nice sheen.
Tuesday, February 03, 2009
Next step is to find a color that would closely match the filming miniature,and looking at the hobby paints available,I decided to go outside the hobby for a match.I am a big proponent of using products made specific for models and model making,but with one caveat,if you cant find what you need in those products then look outside the hobby.I took a part of my Aurora/Monogram Flying Sub to my local Home Depot,and found a color that closely matched my part and the color of the shells on the new model.RUST-OLEUM Painter's Touch Gloss,has a color named Marigold.It matches the plastic color of the shells that you cant tell the painted part from the plastic!A few light coats about a half hour apart,and a final wet coat and it was done.Note:I glued the window part to the bottom shell piece,so that i could lift the top shell off to display the interior.The docking ring and stripe color was chosen from the Testors Model Masters Enamel line:Ford&GM Engine Blue,which seems right to me.
Monday, February 02, 2009
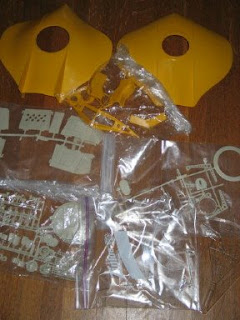
This is the building guide for the Moebius Flying Sub model. I got a test shot of the model in early January.The first thing to do was to look at all the parts.Some parts were missing or wrong,like two right clear window inserts and a missing door.The window would be replaced with acetate and the door was borrowed from another modeller and cast from his part.Next,to find the right color for the body.
Subscribe to:
Posts (Atom)